How Northwest Coast Indigenous Wood Carvings Are Made
- Posted on
- 0
Northwest Coast Indigenous wood carvings are among the most recognizable art forms in the world, bold, precise, and deeply tied to place, family histories, and cultural knowledge. But while many people can identify a carved mask, crest figure, or totem pole, fewer understand how wood carvings are made in Northwest Coast traditions and why each step matters.
This article walks through the northwest coast carving process in a way that’s easy to follow while still respecting the depth of the work. You’ll learn how artists choose wood (especially red cedar), how designs are planned, how carvers remove mass and refine form, and how finishing brings a piece to life. You’ll also see how the indigenous wood carving process changes depending on what’s being made, whether it’s a small rattle, a wall panel, or totem poles that stand for generations.
Because Northwest Coast art is created by many nations, each with distinct histories and styles, it’s important to remember there isn’t one universal formula. What follows is a respectful overview of common steps and traditional carving methods shared across the region, along with practical differences you’ll often see between object types and artists.
What makes Northwest Coast carving distinct?
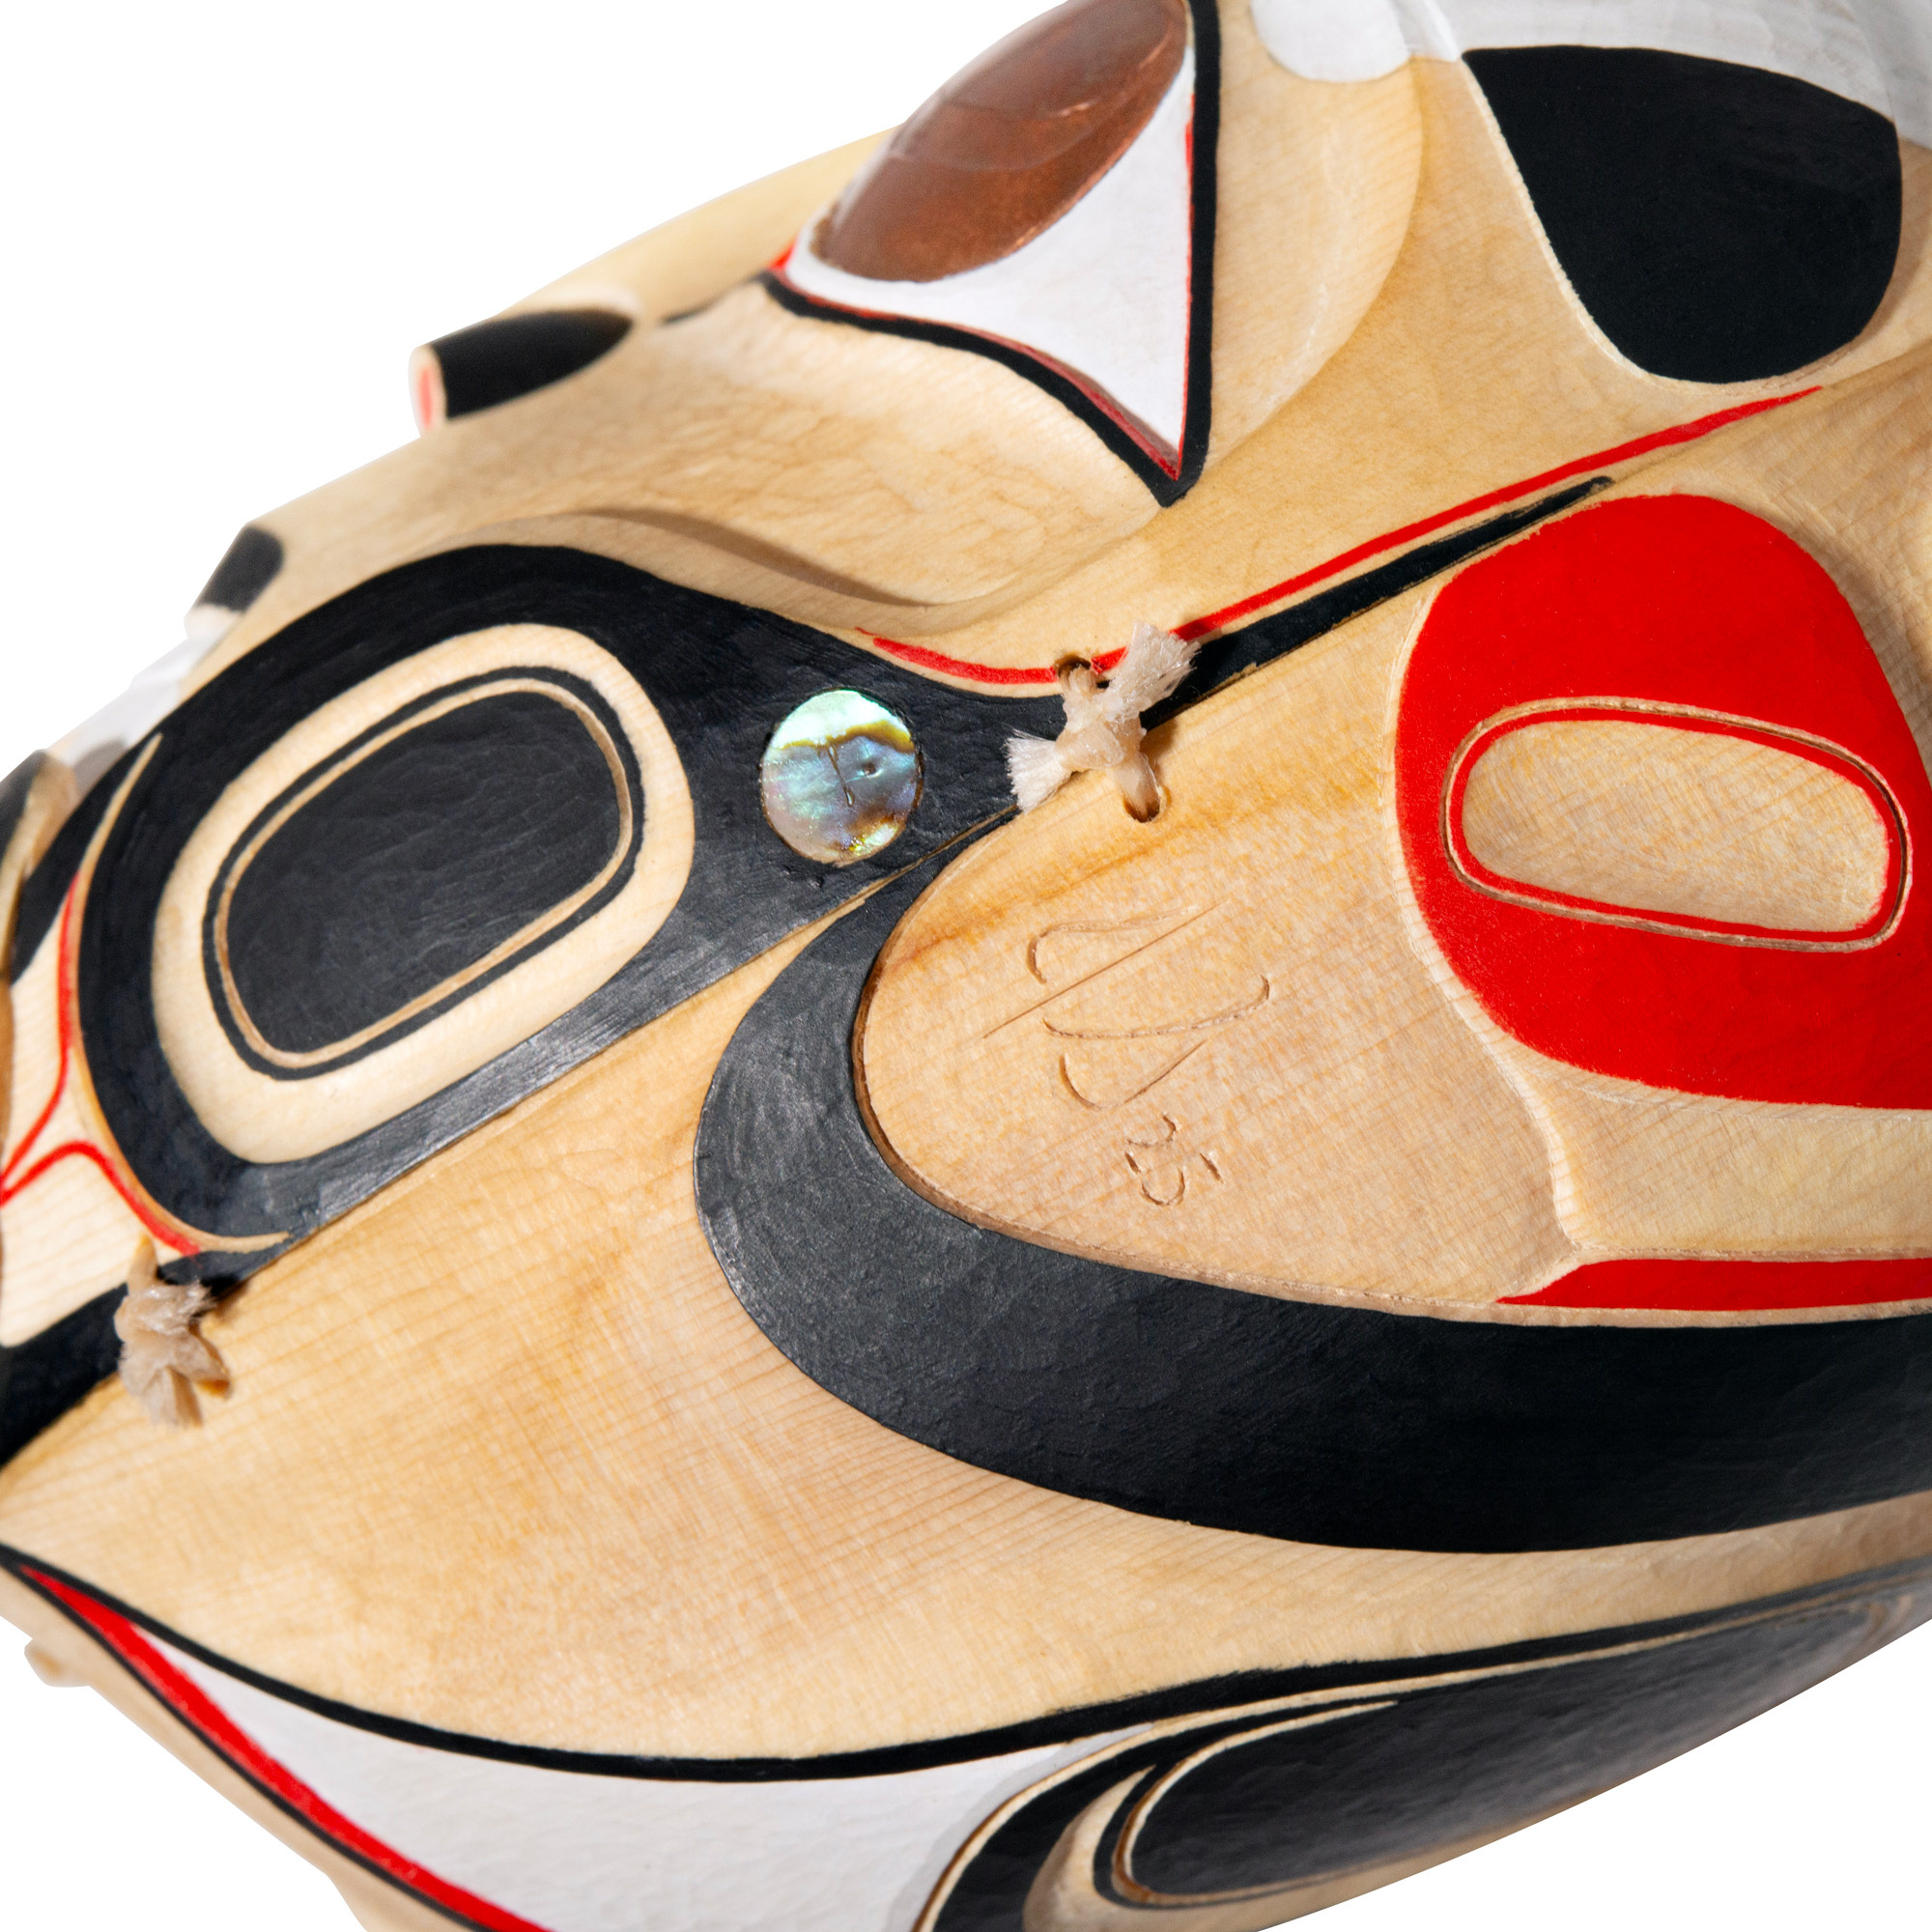
Formline design, ovoids (oval shapes), U-forms (shapes that look like the letter U), and S-forms (shapes that look like the letter S) are some of the visual language used to describe Northwest Coast art. Other visual language includes high-relief carving and strong silhouettes. This art system isn't just pretty; it has meaning, history, and stories behind it. Designs often reflect the values and beliefs of the community they represent, focusing on cherished beings and family rights that demand respect. These are important parts of the community's cultural identity and heritage, so it's important to honour and maintain the stories and traditions that go along with these designs.
That cultural grounding influences how indigenous carvings are made. The carving process is not only about technique; it’s about careful decisions: what figure is appropriate to carve, how it should be presented, and what materials and finishing methods best support the work.
If you’d like a deeper overview of materials and tools used by artists, see Traditional Indigenous Wood Carving: Materials, Tools, and Techniques.
Step 1: Choosing the right wood (and why cedar matters)
The starting point in the indigenous carving techniques of the Northwest Coast is often the wood itself. Different woods carve differently, hold detail differently, and age differently. While artists may use several species, red cedar is especially important across coastal regions.
Why red cedar is used so often
The cedar carving process is prized because cedar is:
• Workable: It can be carved with both hand tools and power tools while still allowing crisp detail.
• Stable for larger work: It performs impressively for big forms like poles and large panels when properly selected and dried.
• Resistant to rot: Especially valuable for outdoor carving and long-term display.
• Culturally significant: Cedar has longstanding, far-reaching significance on the Northwest Coast (in housing, canoes, weaving, and carving).
Artists may also carve yellow cedar, alder, or other woods depending on the piece. The choice often balances tradition, the intended use (indoor/outdoor), the desired detail level, and the size of the blank.
How the raw material is selected
Before a chisel touches the wood, an artist considers practical qualities:
• Grain direction: Straight grain tends to carve more predictably; wild grain can add character but may require more careful tool control.
• Knots and pitch pockets: These may be avoided for fine-detail surfaces or strategically placed where they won’t weaken thin features.
• Moisture and seasoning: Wood that is too wet can move as it dries; timber that is too dry can chip more easily.
• End checks and cracks: Small cracks can sometimes be worked around; major checks may compromise structural areas.
In short, good carving starts with a good block. Material selection is a foundational part of how indigenous carvings are made because it affects everything that follows: structural strength, surface quality, and how the piece will age.
Step 2: Defining the purpose and respecting design ownership
Northwest Coast carvings often depict crest beings or powerful figures, such as Raven, Eagle, Bear, Wolf, Orca, Frog, and many others. Many communities connect specific images, combinations, and narrative contexts to particular families or lineages. Artists may carve within their rights and teachings or create works that are culturally appropriate for public sale (such as contemporary compositions, common regional motifs, or commissioned pieces where permissions and context are clarified).
This distinction is an essential point when learning how indigenous carvings are made: the process begins with intent and responsibility. A design can represent inherited identity and history, reflecting the cultural significance and stories of the indigenous community it originates from.
For a practical guide to what distinguishes artist-made work and why authenticity matters, see What Sets Authentic Northwest Indigenous Carvings Apart.
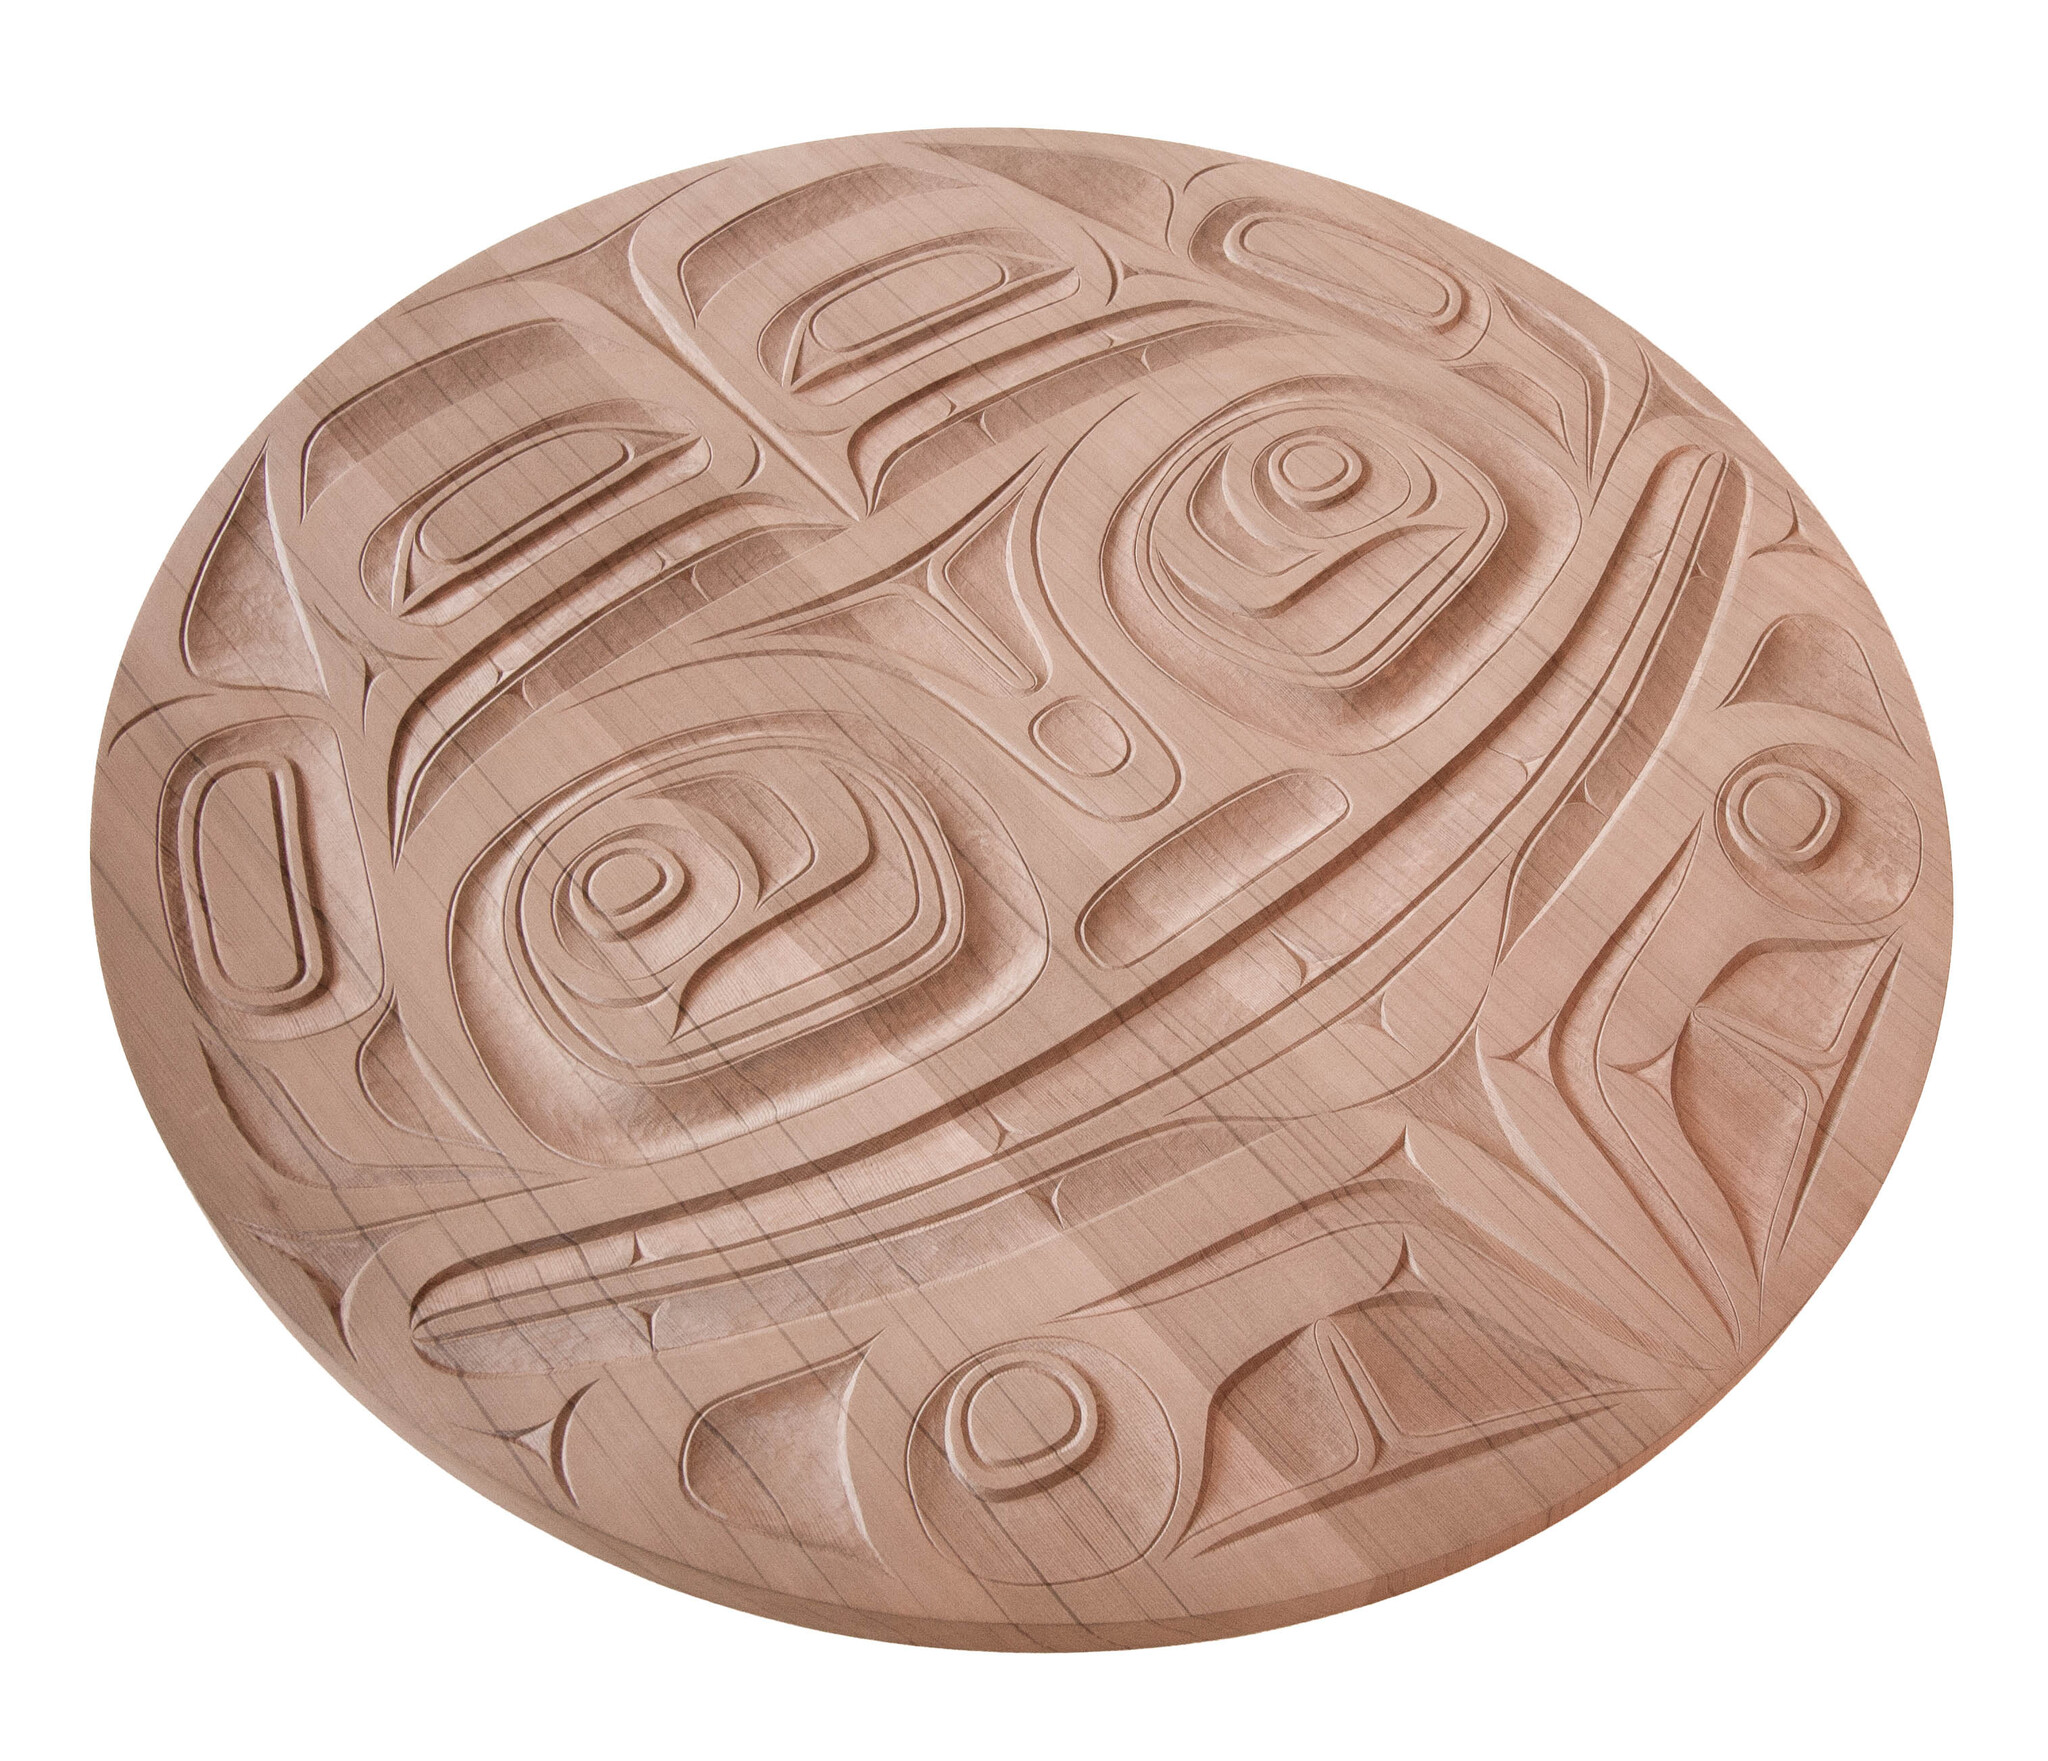
Step 3: Designing the carving (formline planning and layout)
Once the subject and purpose are clear, the artist plans the design. This step is central to Northwest Coast art creation, because the final carving depends on strong underlying design, especially when the piece includes formline elements that must stay balanced and readable from a distance.
From concept to drawing
Many artists begin with drawings, even if they carve primarily by eye. The drawing might be a full composition, a set of views (front/side), or a formline layout that will be transferred onto the wood. Some carvers sketch directly onto the block with pencil or marker; others use paper patterns or templates for key shapes.
Design planning usually considers:
• Front view and profile: Especially important for masks, plaques, and poles where the viewer experiences the work from multiple angles.
• Negative space refers to the open areas, undercuts, and separations between limbs or wings in a design, which affect both readability and structural strength.
• Depth strategy: Where will the high relief sit? Which lines will be shallow, and which will be cut deep?
• Finish and colour: If the piece is painted, the artist plans how carved lines will catch paint edges and create crisp separations.
Transferring the layout to the wood
In many traditional carving methods, the artist marks key reference points first: centerlines, major boundaries, and proportional guides. On larger carvings, snap lines and measuring tools may be used to keep the work symmetrical where intended. For totem poles, layout is often done in stacked sections, with careful attention to how each figure sits above and below the next.
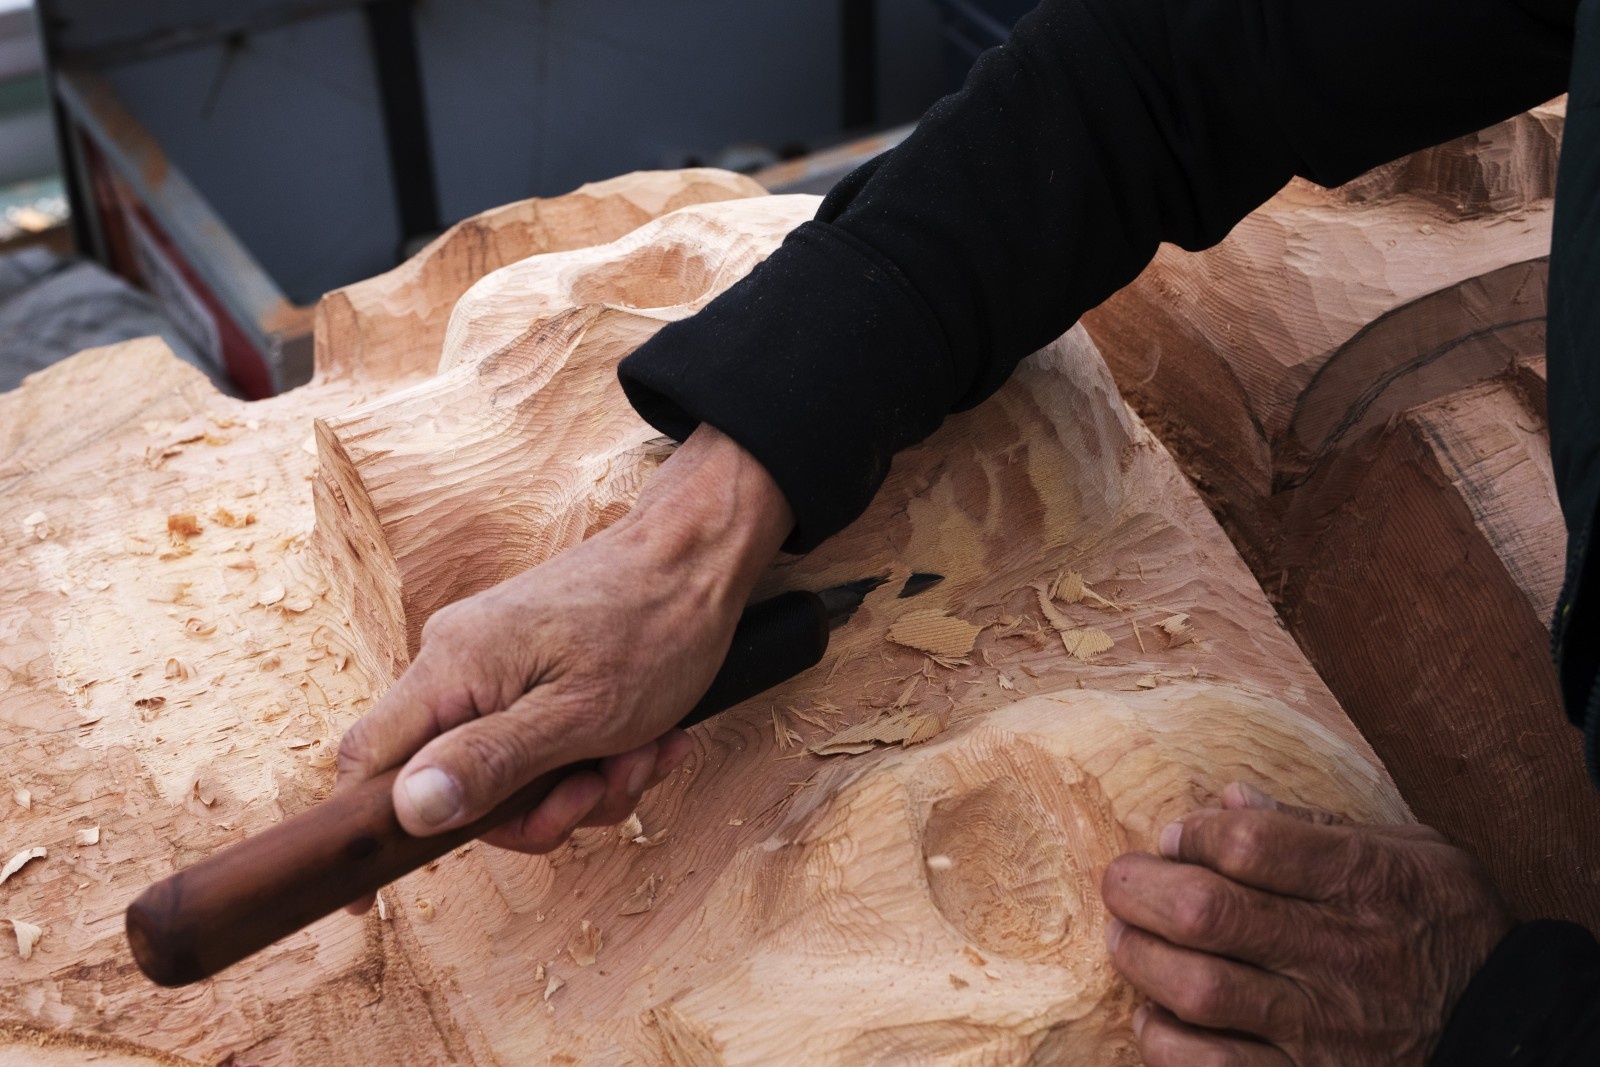
Step 4: Roughing out the form (removing mass)
The roughing stage is where the block begins to look like the intended figure. In the northwest coast carving process, this stage is about major decisions: silhouette, posture, and depth. Mistakes here can’t always be “fixed” later, so carvers typically work methodically to ensure that the silhouette, posture, and depth are accurately represented in the final piece.
Tools used in roughing
Artists may use a blend of hand tools and power tools depending on training, preference, and the piece’s size. Common tools include:
• Adzes: A signature tool for Northwest Coast carving, used to remove material quickly and create characteristic faceted surfaces.
• Large gouges and chisels: For controlled removal and establishing planes.
• Mallets: To drive larger tools through dense grain.
• Power carving tools: Used by some artists to speed roughing, especially for large work.
If you’re curious about the tools themselves and how they’re used safely and effectively, you can explore the Hand Tools section and the materials-and-tools article linked earlier.
How form is established
During roughing, the artist typically:
1. Defines the outer silhouette (the overall outline seen from the front and side).
2. Blocks in major planes (forehead, cheeks, beak, wings, and limbs), often as angular facets that will later be smoothed or refined.
3. Sets primary depths so the most important features sit forward and secondary elements fall back.
4. Leaves extra material in delicate areas (thin edges, projecting parts) until later to reduce breakage.
This is where you can really see the difference between simply cutting wood and a practiced indigenous wood carving process: the carver is constantly thinking ahead about how the grain will behave, where stress points will be, and how light will hit the finished surface.
Step 5: Refining shapes (creating flow, symmetry, and tension)
After roughing, the carving moves into refinement. This stage brings clarity and life to the work: edges become intentional, curves become consistent, and the piece’s “gesture” starts to read.
Clean curves and controlled edges
Northwest Coast carvings often rely on a balance between rounded surfaces and crisp boundaries. Refinement involves:
• Re-cutting key lines so they are clean and confident.
• The process also entails smoothing out surfaces while maintaining the unique characteristics of tool marks where desired.
• Strengthening symmetry (for masks and panels) or intentionally breaking it (for dynamic, turning forms).
• Enhancing the transitions between planes enhances the cohesiveness of the carving, preventing it from appearing "stuck together."
Working with grain rather than against it
One of the most practical indigenous carving techniques is learning to read grain direction and adjust cuts accordingly. Cutting with the grain can produce smooth, controlled shavings; cutting against it can tear fibres and cause splintering. Experienced carvers shift tool angles, switch tools, or alter the cutting sequence to keep surfaces clean.
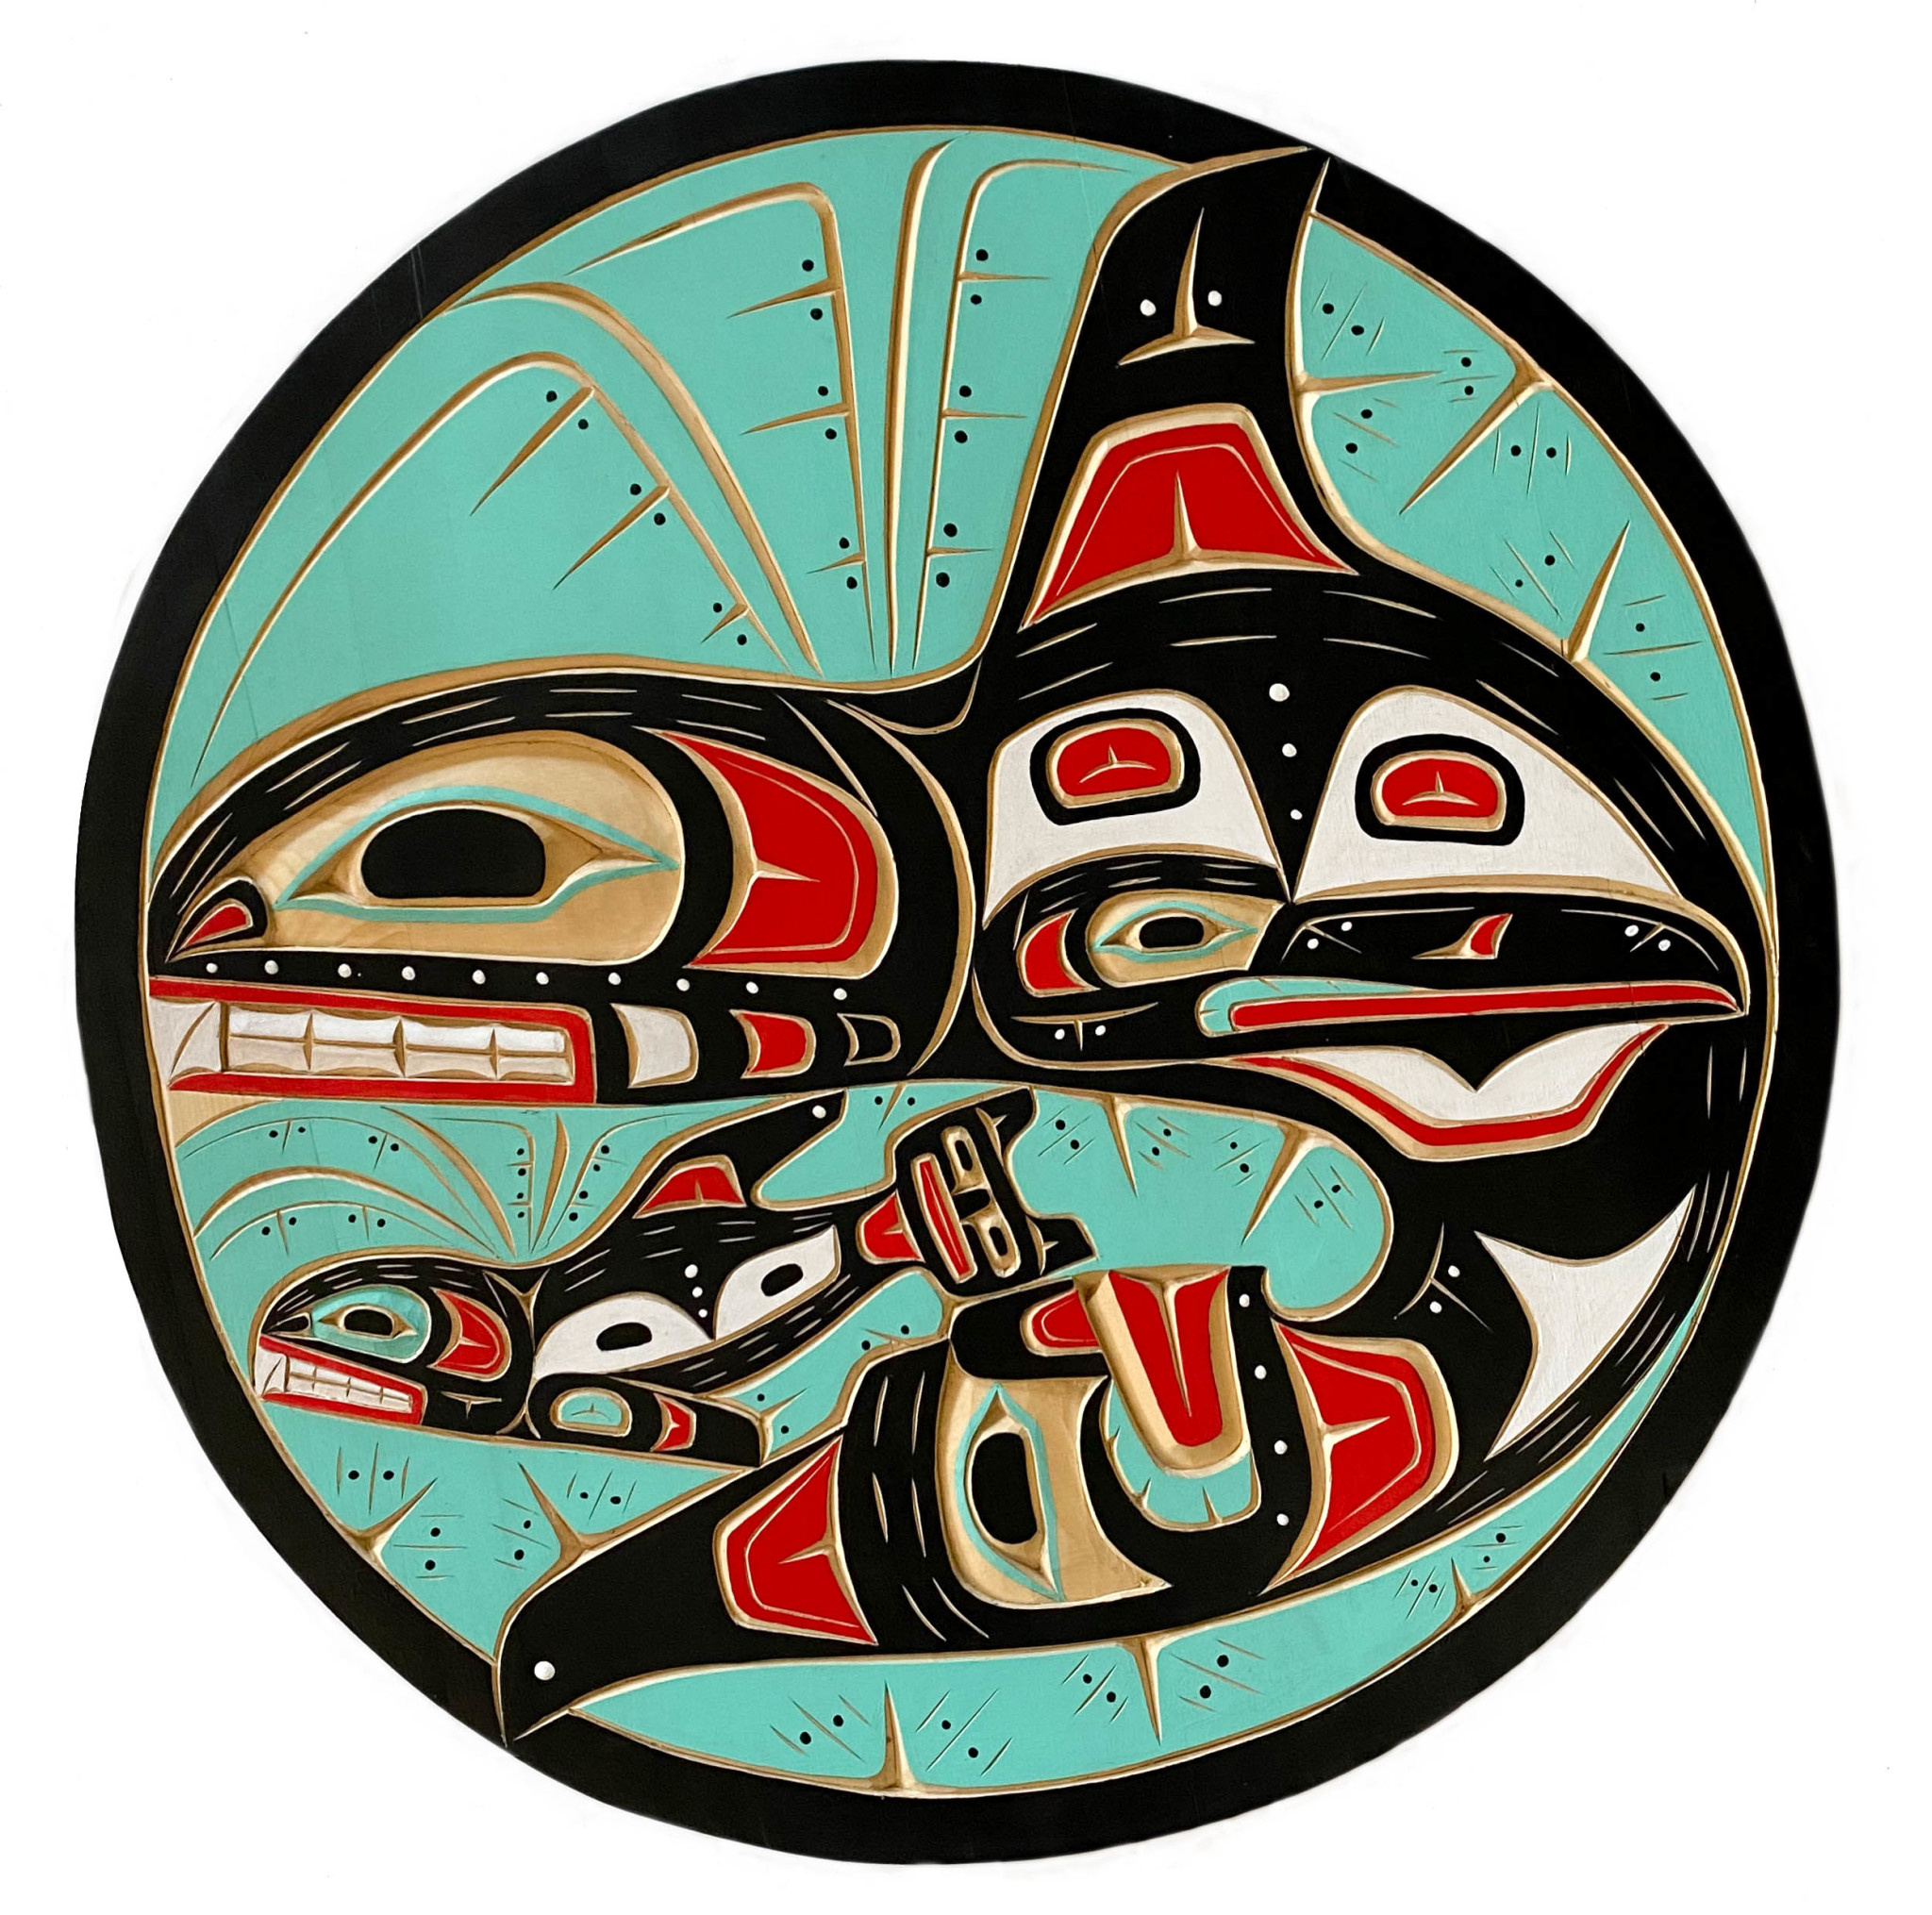
Step 6: Formline carving and detailing (eyes, feathers, teeth, and more)
For many viewers, this phase is the stage that looks most “magical,” because small changes dramatically increase expression. Formline elements and fine details bring visual language into sharp focus.
Carving formline elements
Formline design often includes raised or recessed areas that create strong contrast. Carvers may:
• Incise lines (cut into the surface) to separate shapes.
• Relief carve (leave the formline raised) so it reads as a bold, continuous path.
• Undercut certain edges to deepen shadows and increase separation.
Precision matters here. An ovoid shape that is slightly off can change the expression of a face; a U-form shape that is too tight can make a wing look cramped. In the northwest coast carving process, detailing is as much design discipline as it is hand skill.
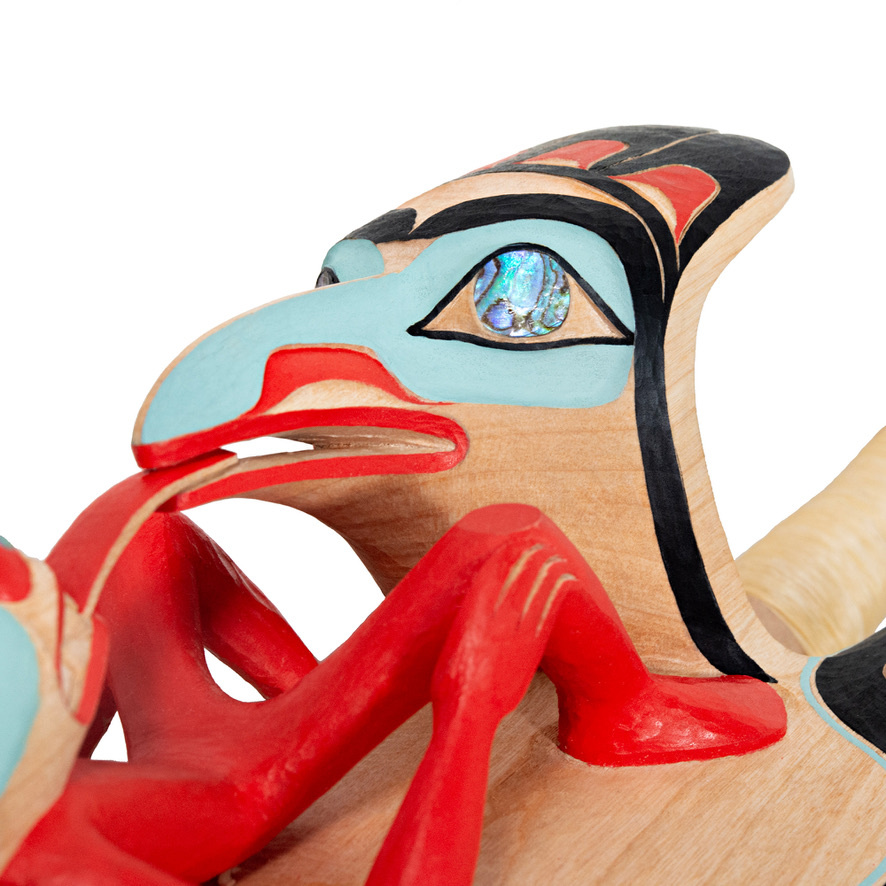
Expression and anatomy
Features such as eyes, brows, nostrils, teeth, tongues, and claws are often stylized but still follow internal rules, which dictate how these elements can be exaggerated or simplified to convey specific emotions or characteristics. The “expression” of a figure can be intensified through:
• Depth: Deep eye sockets and strong brow ridges can create dramatic shadows.
• Angle: Slight tilts in eyelids or beaks can shift mood.
• Spacing: Narrowing or widening elements can create tension or calm.
This step is one reason handmade indigenous carvings feel alive: each artist’s hand and decision-making show in the smallest forms.
Step 7: Hollowing (common in masks, rattles, and some sculptures)
Not all carvings are solid. Masks are often hollowed for wearability and balance, and rattles may be hollowed to create sound chambers. Hollowing is also used to reduce weight in larger sculptures.
Why hollowing is technically demanding
Hollowing requires planning because the carver must remove interior wood while preserving a consistent wall thickness and structural integrity. Too thin and the piece becomes fragile; too thick and it becomes heavy or acoustically dull (in the case of rattles).
Common approaches include:
• Splitting and rejoining (in some traditions and object types), where the piece is opened, hollowed, and fitted back together.
• Hollowing is often done from the back, leaving the front face intact.
• Hollowing through access points and closing them with plugs or fitted elements is more common in some contemporary methods, particularly in the creation of sculptures and functional objects where maintaining the integrity of the outer surface is essential.
In a gallery setting, you’ll often find this kind of work in Masks and Headdresses and Hand Carved Rattles.
Step 8: Sanding and surface preparation (or preserving tool marks)
When people ask how wood carvings are made, they often imagine a smooth, sanded finish as the default. In Northwest Coast carving, finishing choices vary widely by artist, nation, and intended effect.
Sanded vs. tooled surfaces
Some artists sand to a refined surface that supports crisp paint edges and a polished look. Others intentionally preserve adze marks or chisel facets because those tool traces show the carving’s energy and handwork. Neither approach is “more authentic” by itself; it’s an artistic decision.
Surface prep may include:
• Selective sanding (smoothing some planes while leaving others textured).
• Edge sharpening with knives or small chisels rounds out the details after sanding.
• Filling small cracks or voids when appropriate for the intended finish.
Step 9: Painting, staining, and inlay (bringing contrast and depth)
Many Northwest Coast carvings are painted, while others are left natural, stained, or oiled. Painting is not an “extra” step; it’s often part of the design language itself, clarifying formline relationships and strengthening readability.
Traditional and contemporary paint approaches
Historically, pigments were derived from natural sources, and application methods reflected local practices. Today, artists may use modern paints for durability and colour consistency. The key is that the paint follows the carving’s design and enhances it rather than hiding it.
Common colour choices include black, red, and blue-green tones, though palettes can vary. Paint is typically applied in layers, with careful edges where colours meet. A well-carved line helps a painter create a crisp boundary; in that way, carving and painting are inseparable in the overall process of creating Northwest Coast art.
Inlay and added materials
Some works include inlaid materials (for example, in eyes) or added elements like hair, feathers, or metal components, depending on the piece and cultural context. These additions require different skills, such as fitting, drilling, pinning, and careful adhesive choices while keeping the piece visually balanced.
Step 10: Finishing and sealing (protecting the work)
After carving and painting, a finish may be applied to protect the surface and unify the sheen. Choices vary: some artists prefer matte finishes that feel close to the wood; others use glossier coatings for stronger colour saturation and easier cleaning.
Finishing considerations include:
• Intended environment: Indoor display differs from outdoor exposure.
• Handling: Items like paddles, bowls, or rattles may need more durable finishes.
• Future care: Some finishes are easier to maintain or touch up than others, which can significantly affect the longevity and appearance of the items over time, especially when considering factors such as exposure to humidity and temperature changes in different environments.
For owners who want to care for their pieces responsibly, see How to Preserve Your Northwest Indigenous Carvings.
How the process changes by carving type
While the steps above describe a common pathway, different objects demand different planning, tooling, and structural strategies. Here’s how the indigenous wood carving process often shifts depending on what’s being made.
Masks and headdresses
Masks prioritize fit, weight, and interior comfort. The carver must balance dramatic features with wearable structure. Hollowing and edge thickness become critical, and paint choices may be designed for performance visibility as well as close viewing.
Explore examples here: Masks and Headdresses.
Totem poles (monumental carving)
Making totem poles is one of the most complex forms of the Northwest Coast carving process. A pole involves major material selection, engineering, and long-term planning. Even smaller “totem pole” carvings follow the same basic idea: stacked figures with clear silhouettes and strong narrative structure.
Key differences in totem pole work often include:
• Log selection and orientation: The pole’s grain, taper, and checks influence figure placement.
• Large-scale layout: Figures must be readable from a distance; proportions may be exaggerated for visibility.
• Deep relief strategy: Shadows help figures separate visually on tall forms.
• Installation planning: For monumental poles, raising methods and long-term weathering are part of the project.
To learn more about cultural and historical context, see Totem Poles of the Northwest Coast. You can also view carved pole works here: Totem Poles.
Wall panels and plaques
Panels and plaques are excellent examples of how formline design and relief carving work together. Because the surface is relatively flat, the carving depends on clean depth control and precise line work to create contrast. Small inconsistencies can be more noticeable on a plain surface than on a fully sculptural piece, such as in the case of wall panels and plaques where the design relies heavily on the precision of the carving to achieve visual impact.
See examples: Wall Panels and Plaques.
Boxes and chests (joinery and carving combined)
Boxes and chests bring woodworking accuracy into the carving world. The artist may carve the formline design on panels, but the object must also fit together cleanly, open smoothly, and remain stable over time. A small error in squareness or thickness can affect the function.
Explore: Boxes and Chests.
Bowls
Bowls often involve hollowing and surface refinement, with attention to symmetry and comfortable handling. Some bowls are primarily functional, while others are sculptural presentation pieces, showcasing artistic design and craftsmanship that may not prioritize utility, such as decorative bowls used for display rather than for serving food. Grain direction and cracking risk are major considerations when removing interior material.
Explore: Bowls.
Paddles
Paddles require a balance between strength, weight, and aesthetics. Even when made for display, a paddle’s form carries functional logic: a straight shaft, a consistent blade thickness, and strong grain alignment. Carving and painting must respect those structural needs.
Explore: Paddles.
Miniature carvings
Miniatures concentrate the same visual language into a small space. This task demands extremely controlled toolwork—tiny gouges, knives, and fine sanding, while still keeping forms readable. Many artists simplify certain details to preserve clarity at a small scale, which is a design skill, as they must balance the intricacy of their work with the need for the viewer to easily interpret the miniature's overall form and intent.
Explore: Miniature Carvings.
What “handmade” really means in Indigenous carving today
People sometimes assume “handmade” means only hand tools and no modern equipment. In reality, handmade indigenous carvings are defined more by the artist’s authorship, skill, and decision-making than by a strict tool list. Some artists rough out shapes with power tools and finish with hand tools; others work almost entirely with adzes, chisels, and knives. Both approaches can be artist-driven, culturally grounded, and technically excellent.
What matters most is that the piece is designed and carved by the artist, not mass-produced or mechanically replicated without artistry. The finishing stages—detailing, painting, and final refinement—are typically where you see unmistakable handwork and individual style.
Common questions about how Indigenous carvings are made
How long does it take to make a Northwest Coast carving?
Time varies dramatically by size and complexity. A small rattle or miniature may take anywhere from days to weeks. Weeks or months may pass before a detailed mask or panel is completed. Large-scale works, especially totem poles, can take months or longer, depending on the number of figures, depth of relief, drying time, and finishing requirements.
Is cedar always used?
No, but cedar is a frequent choice for good reasons. Some artists choose other woods for different textures, hardness, or local availability. The best wood for a project depends on the object’s purpose, desired detail, and the artist’s preferred working characteristics.
Why do some carvings have visible tool marks?
Tool marks can be intentional. Adze facets and chisel textures may be left to show movement and craftsmanship or to catch light in a particular way. Other artists prefer a smooth, polished surface. Both can be part of the region’s carving traditions and contemporary innovation.
Are totem poles carved as a single piece?
Many poles are carved from a single log, especially in monumental forms, though the specifics depend on the project and the artist’s approach. Other carved poles may include separate attached elements like wings, fins, or horns, depending on the artistic vision. In all cases, the design and structure must account for grain, weight, and long-term stability.
Seeing the process in the finished work
Once you understand the steps, from selecting cedar and laying out the formline design to adzing, refining, painting, and sealing, you can “read” a carving differently. You notice where the depth changes deliberately, how the design balances negative space, and how the finish supports the story the artist wants the piece to tell.
If you’d like to explore a wide range of carved works, each reflecting different subjects, sizes, and approaches, you can browse Northwest Indigenous Carvings. Seeing multiple object types side-by-side is one of the best ways to understand how the same core indigenous carving techniques adapt across masks, panels, bowls, boxes, and poles.
Ultimately, the best answer to how indigenous carvings are made is that they’re created by combining design knowledge, disciplined toolwork, respect for material, and cultural responsibility, using carving methods developed over generations and continually renewed by artists today.


Comments
Be the first to comment...