Traditional Indigenous Wood Carving: Materials, Tools and Techniques
- Posted on
- 0
Traditional Indigenous wood carving: living knowledge in wood
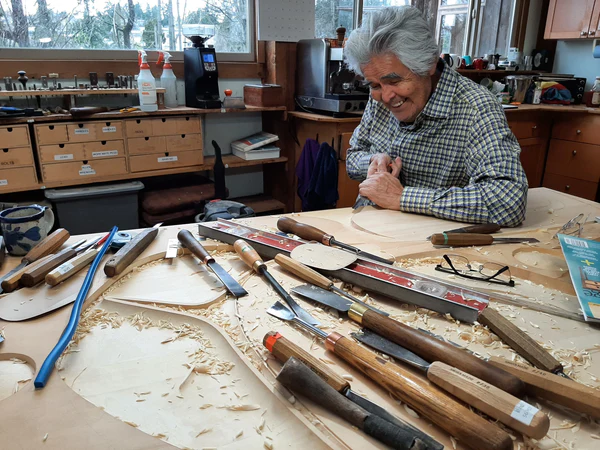
Indigenous wood carving across the Northwest Coast of what is now British Columbia and Alaska is both art and cultural practice, a way of recording lineage, telling history, honouring relationships with animals and ancestors, and making objects used in ceremonies and daily life. While many people first encounter Indigenous wood carvings in galleries or collections, the heart of the work is in the process: choosing carving materials like cedar, preparing surfaces, laying out formline design, and using traditional carving tools with skill built through years of learning.
This guide is an informational look at traditional Indigenous carving, with an emphasis on Northwest Coast carving traditions. Because Indigenous nations are distinct, there is no single set of rules that applies everywhere. Carvers may use family methods, community teachings, and contemporary adaptations, which can vary significantly between different Indigenous nations and reflect their unique cultural identities. What remains consistent is respect: for the material, for the knowledge behind the imagery, and for authentic carving methods that keep the work culturally grounded.
Carving materials: why wood choice matters
In traditional indigenous carving, the material is never a neutral choice. Each wood has its grain, density, scent, and behaviour under the blade. These qualities affect everything: how a design is laid out, how deep forms can be cut, how a surface holds paint, and how an object will endure in coastal climates.
Cedar Carving, Northwest Coast: the foundational material
When people think of cedar carving Northwest Coast traditions, they are usually referring to western red cedar and yellow cedar. Cedar is valued for its workability and its cultural importance. It splits cleanly, can be hollowed for masks and boxes, and resists rot better than many local species. It also carries meaning beyond decorative carving: cedar has long been used for housing, canoes, clothing, weaving, and tools.
For carvers, cedar’s properties are practical and artistic:
• Straight grain and predictable cutting support clean, flowing curves typical of formline design.
• Lightweight strength makes it suitable for large-scale works like poles and panels.
• Rot resistance helps outdoor carvings endure, especially when properly finished and cared for.
Other woods used in Indigenous carving
While cedar is iconic in Northwest Coast carving, other woods have long been used depending on availability and purpose:
• Alder: softer and often used for practice pieces, smaller carvings, or items where a smoother cut is desired.
• Maple: harder, with tight grain that can take fine detail, though it requires more effort with edge tools.
• Birch: can be carved for smaller objects; its behaviour depends heavily on moisture content and grain.
• Yew: dense and strong; historically used for implements and can be carved for certain functional items.
Today, many artists also carve reclaimed wood, salvaged beams, or storm-fallen cedar when it is appropriate and safe to work. Using a piece with history can be meaningful, but it also requires careful inspection for embedded metal, rot pockets, and checks.
Selecting a log or blank: grain, knots, and stability
Before any drawing begins, a carver evaluates the wood. This step is part of Indigenous carving techniques, because a design that ignores grain direction can split, chip, or weaken over time. Key considerations include:
• Grain direction: long fibres support long, clean cuts; changing grains can tear out when carving across them.
• Knots: can be beautiful but unpredictable; they may be avoided for delicate areas like thin protrusions.
• Moisture content: green wood carves differently than seasoned wood; each affects tool choice and finishing, with green wood being softer and easier to carve but more prone to warping, while seasoned wood provides a more stable and predictable carving experience.
• Checks and cracks: surface checks may be manageable; deep cracks can compromise structural integrity.
Green wood vs. seasoned wood
Some traditional indigenous carving is done in green wood (freshly cut), especially for certain larger forms where the wood is easier to shape quickly. Green cedar can carve smoothly, but it It will move as it dries, which can cause checks to open. Seasoned wood is more stable but harder, and it may be more brittle if overly dry. Many carvers balance these factors by roughing out a form first, allowing it to acclimatize, then refining details later.
Traditional carving tools: from adze to knife
The phrase "traditional carving tools" often brings to mind classic edge tools: adzes, crooked knives, and chisels. Historically, Northwest Coast toolkits included stone, bone, shell, and later iron. Today, many carvers use modern steel because it holds a keen edge and is practical for daily work, but the ways tools are held, pushed, and guided remain strongly connected to older methods. In authentic carving methods, it’s not only the tool itself that matters, but also how it is used and maintained, including the techniques of grip, pressure, and angle that reflect traditional practices.
Adzes: shaping with rhythm and control
The adze is central to many Indigenous carving techniques. It can remove material quickly while still leaving a controlled surface. Adzes may be used to:
• Rough out the overall form from a blank page.
• Hollow masks, bowls, and boxes.
• Create facets that later become refined planes in the finished carving.
Carvers develop a sense of rhythm with an adze: the swing is controlled by the wrist and forearm, with the body positioned to keep cuts consistent. Different blade curvatures and widths suit different tasks, from broader hollowing to tighter shaping. Because adzes can remove wood fast, they require careful safety habits and a stable work setup.
Gouges and chisels: defining formline and relief
Chisels and gouges bring precision. In northwest coast carving, they are used to establish crisp edges that make the formline design read clearly at a distance. Common uses include:
• V-tools are commonly used to define separating lines and create crisp junctions.
• U-gouges are commonly used for rounding interior ovoids, crescents, and channel cuts.
• Flat chisels are used for smoothing planes and creating sharp transitions.
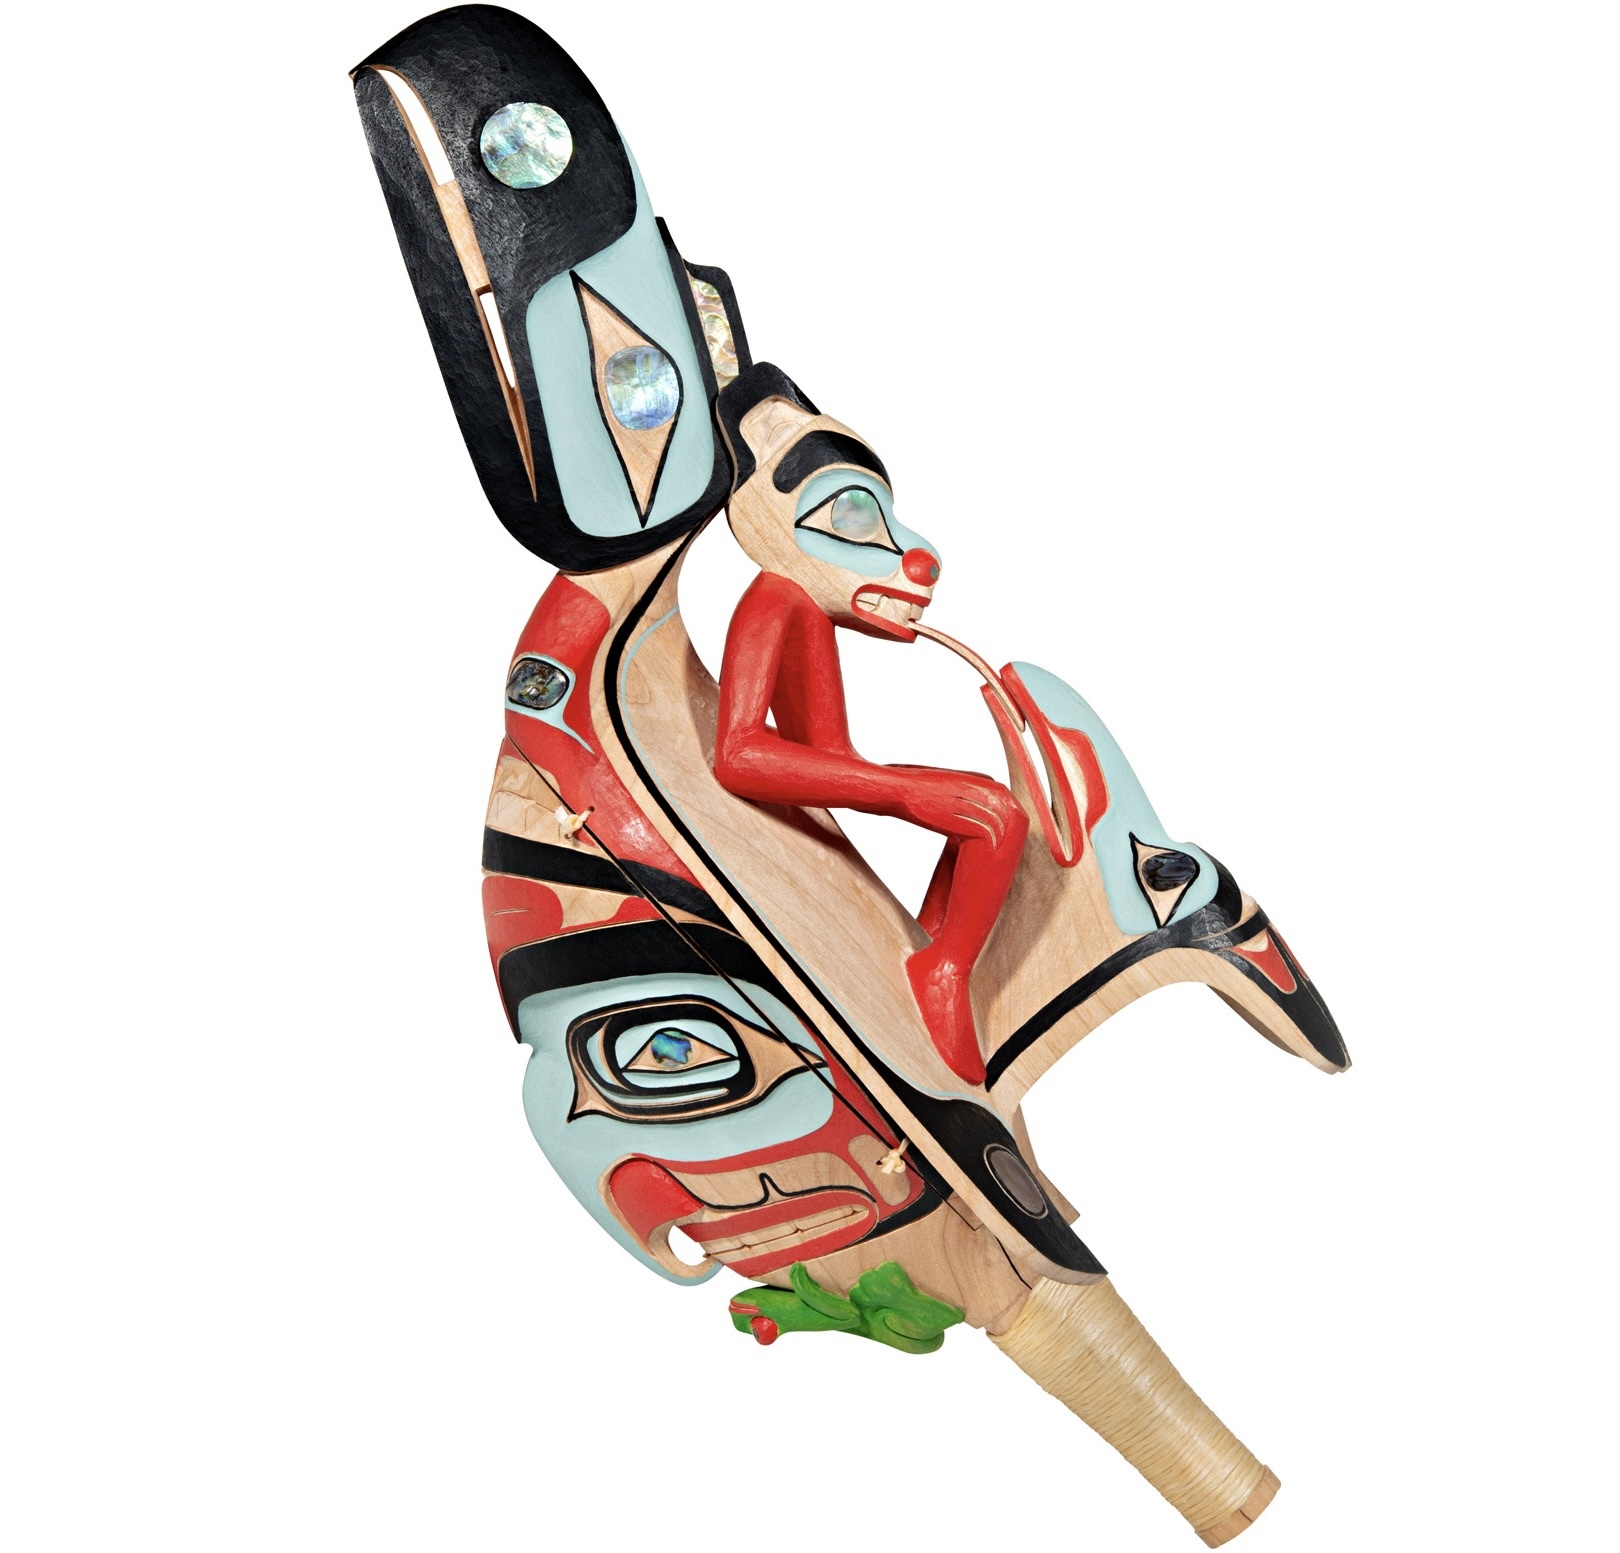
A hallmark of many Indigenous wood carvings is the way lines swell and taper and the way negative space supports the composition. These effects come from disciplined tool control: consistent depth, clean stop-cuts, and intentional bevels.
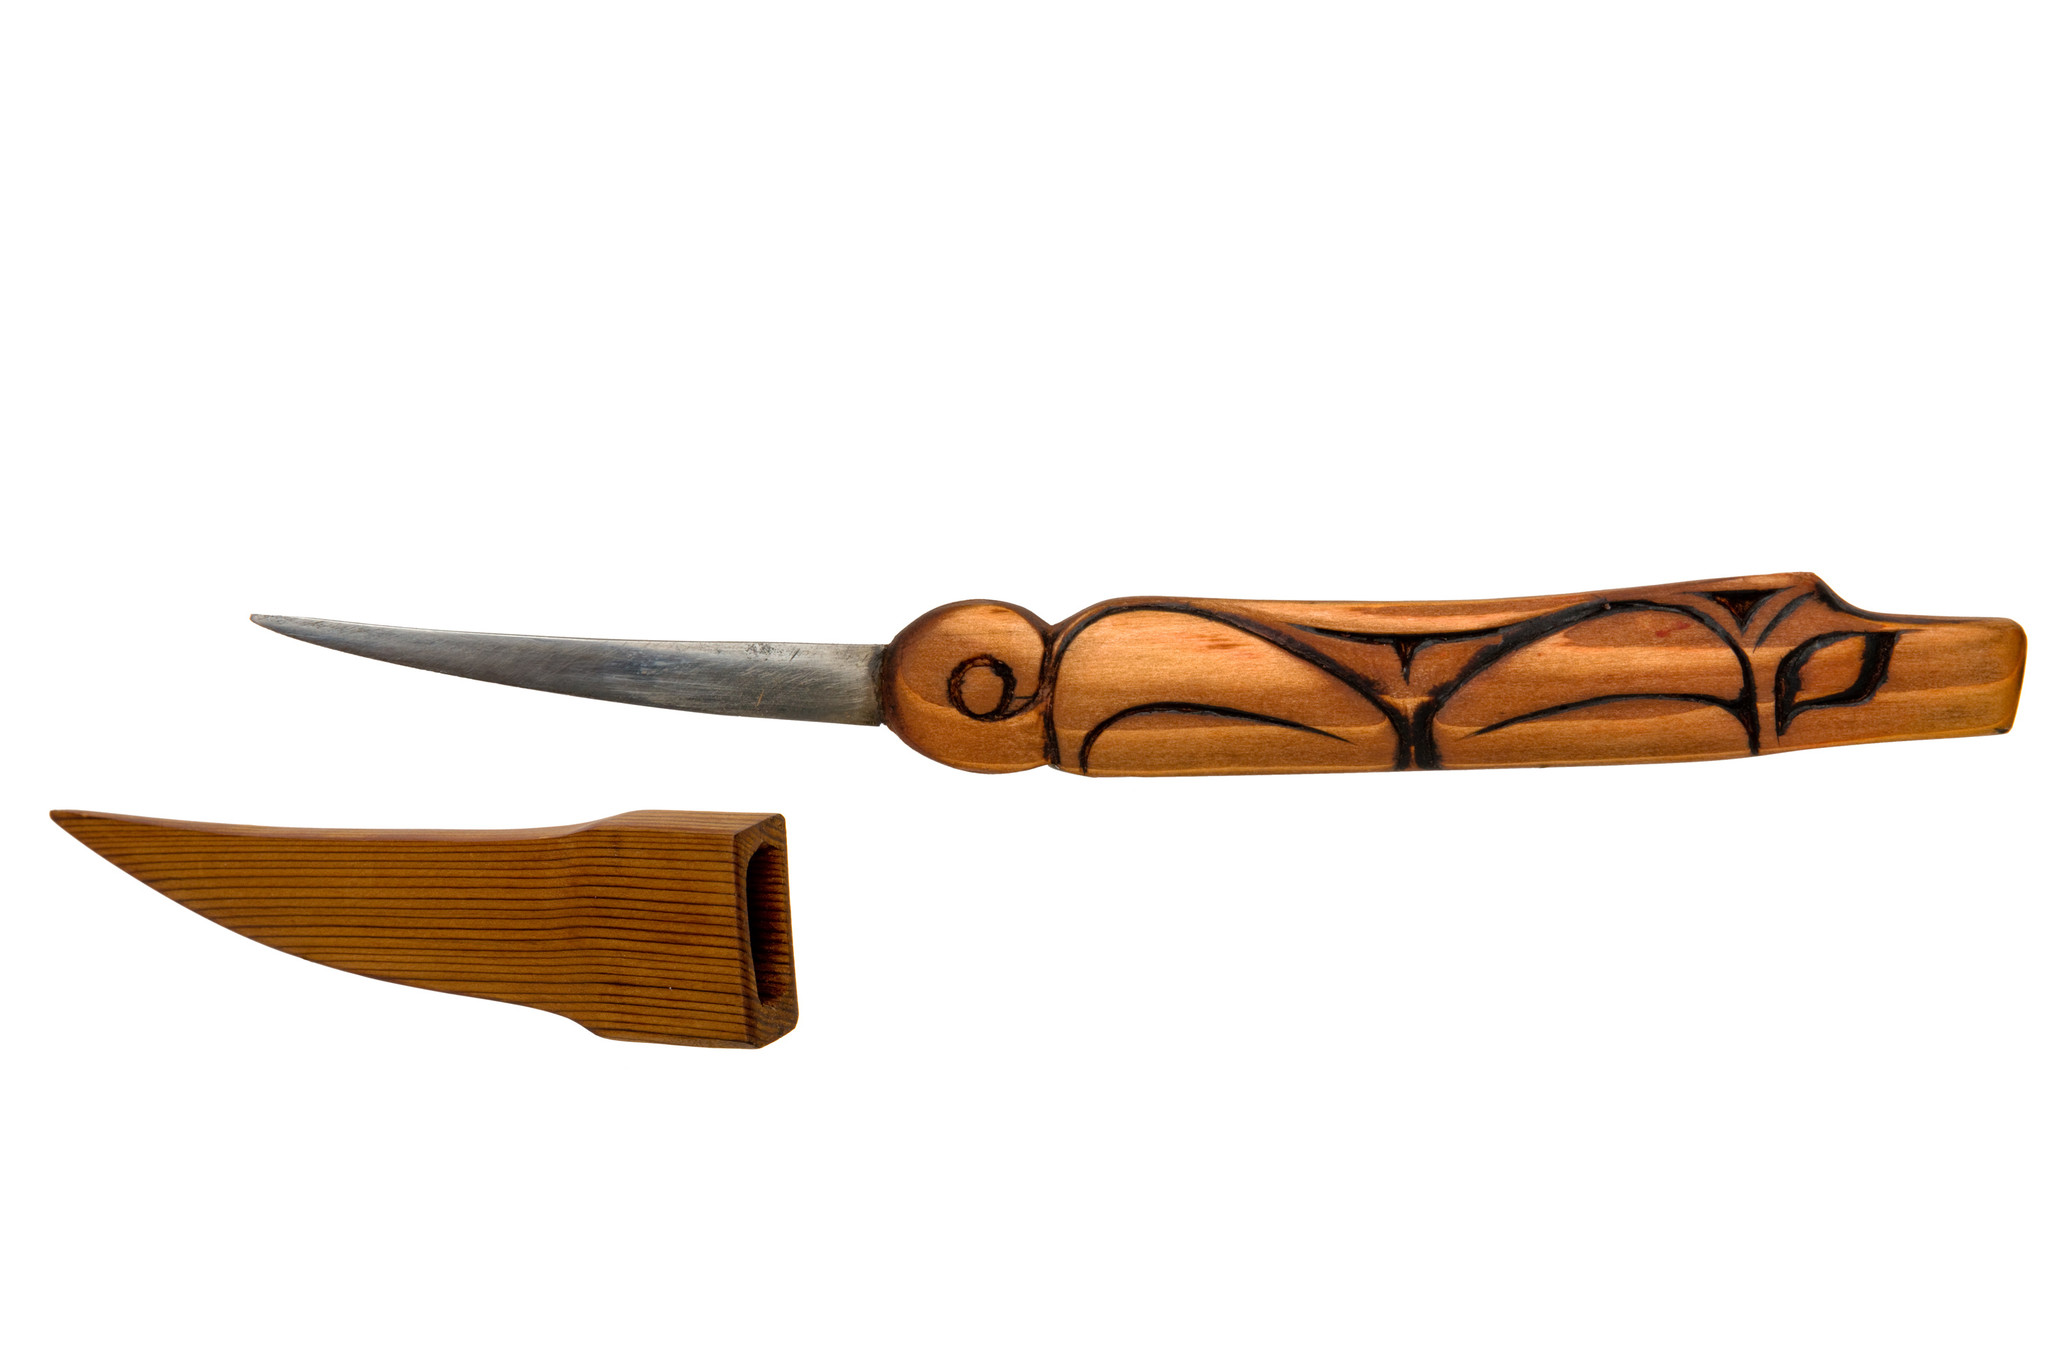
Knives: detail, cleanup, and finishing cuts
Carving knives are used for fine work and for “cleaning” cuts where a chisel may leave slight facets. Many carvers keep several knives shaped for different tasks: straight edges for trimming, curved blades for interior arcs, and small detail knives for tight corners. Knife work is also where the carver’s hand becomes especially visible, as subtle surface decisions influence how light plays across the final piece.
Crooked knives and hook knives: hollowing and controlled slicing
Crooked knives (and related hook knives) are important for hollowing, especially in items like bowls, ladles, and certain mask forms. Their geometry allows a slicing cut that follows curves without forcing the wrist into awkward positions. In many Indigenous carving techniques, the slicing cut is preferred over scraping because it produces a cleaner surface and respects grain direction.
Rasps, files, and sanding: when and why they are used
Whether rasps and sandpaper are used can vary by carver and by cultural preference, and it often depends on the desired surface. Some artists prefer an edge-tool finish that preserves tool marks as evidence of process. Others refine surfaces to prepare for paint or to achieve a particular sheen. What’s consistent in authentic carving methods is that surface finishing is intentional, not automatic: the carver chooses how the surface will communicate.
Sharpening: the quiet skill behind every cut
Sharp tools are not a luxury; they are foundational. Dull edges tear fibres, cause splintering, and require extra force, which can lead to slips. Carvers typically develop a sharpening routine that may include stones, strops, and careful attention to bevel angles. In practice, sharpening is part of the carving session, not something saved for later.
Indigenous carving techniques: process from design to finish
There are many ways to carve, but a common thread in traditional indigenous carving is a structured workflow: the design is resolved before deep cuts are made, then the form is built in stages. This helps keep proportions correct and preserves the clarity of the imagery.
1) Preparing the surface and establishing reference lines
Before laying out a design, the carving surface is prepared. Depending on the piece, that may mean planing, adzing to a flat, or lightly sanding. Reference lines help maintain symmetry and alignment. On panels, a centerline and borderlines guide the composition. On masks, reference points align eye, nose, and mouth placement.
2) Drawing and transferring the design
In northwest coast carving, many designs begin as drawings. The drawing is refined until the relationships among major shapes are correct. The design might be sketched directly on the wood, transferred using tracing methods, or built up with measured guidelines. The goal is to prevent “carving to fix a drawing.” When the drawing is strong, carving becomes the act of revealing it in three dimensions.
3) Roughing out: removing mass without losing the plan
Roughing out is where adzes and larger gouges often shine. The carver removes bulk wood to establish depth differences: raised form areas, recessed backgrounds, and major contours. The key is to work incrementally. Removing too much too early can force compromises later, especially around thin edges, beaks, fins, or hands.
4) Setting primary and secondary forms
After roughing out, the carver defines primary forms (the largest visual elements) and then secondary forms (interior components). In formline-based work, the primary forms might include:
• The carver establishes the main formlines and ensures their consistent width.
• It is crucial to define ovoids and U-forms as structural elements, not just decorative ones.
• Carving the negative spaces so the positive shapes read clearly.
5) Clean edges and controlled depth
One of the easiest ways to spot skilled indigenous carving techniques is in edge control. Clean edges come from deliberate stop-cuts and consistent tool angles. Depth control matters because it affects shadow and legibility. In relief carving, a small change in depth can make an eye socket feel alive or make an ovoid look flat.
6) Detailing: texture, anatomy, and expression
Detailing is where individuality emerges. Depending on the style and the piece, details can include:
• For whiskers, feathers, or hair, incisive lines can be used.
• Texturing can be used to suggest fur, scales, or bark.
• Subtle asymmetry is employed to evoke expression and movement.
In many Indigenous wood carvings, detail is used strategically. Too much can clutter the reading of the main forms. The most effective detail supports the overall design rather than competing with it.
7) Finishing: paint, stain, and protective coatings
Finishing choices vary by community, era, and the intended use of the piece. Some carvings are left natural to emphasize the cedar’s warmth. Others are painted, traditionally using strong contrasts that amplify the formline design. Protective finishes may be applied to stabilize colour and reduce moisture exchange, especially for items displayed in variable environments.
If you’re collecting or caring for a piece, the best practice is to follow conservation-minded guidance rather than experimenting with household oils or sprays. For more on care, see How to Preserve Your Northwest Indigenous Carvings.
Formline design: the visual language behind many Northwest Coast carvings
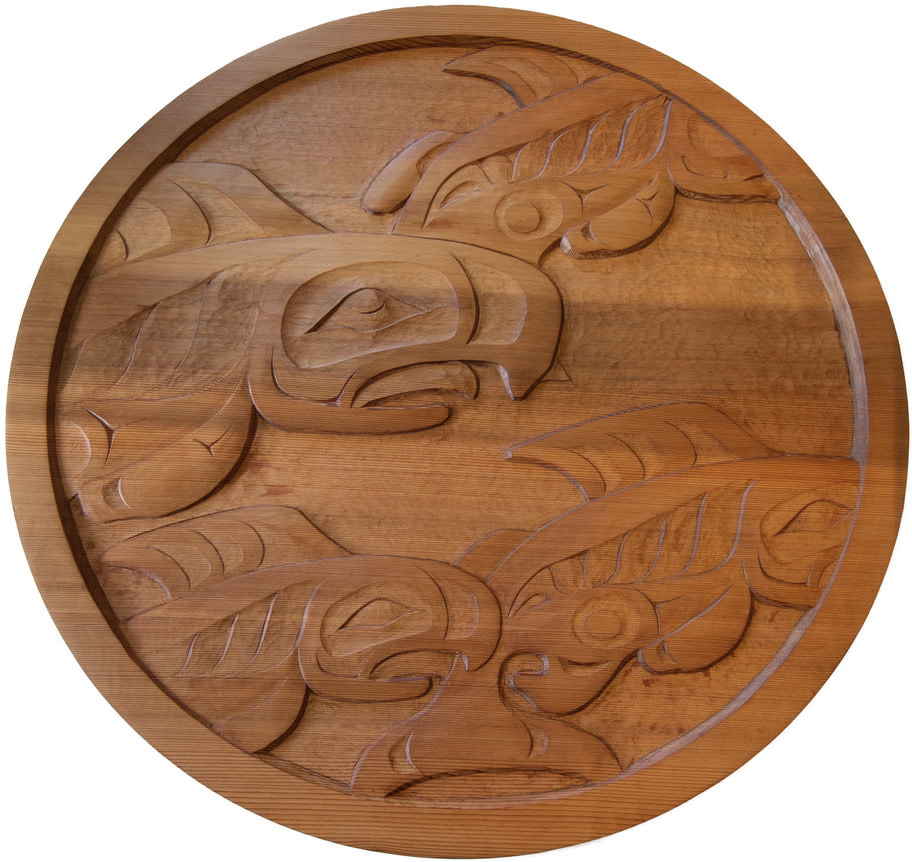
Formline design is a foundational design system used in many Northwest Coast art traditions. It is not simply a “style”; it is a visual language with rules for how shapes connect, expand, compress, and transform. Understanding formline helps viewers appreciate why certain lines thicken, why ovoids sit where they do, and why negative space is as meaningful as positive form.
Core elements: formlines, ovoids, and U-forms
While teachings differ among artists and nations, three common building blocks are often discussed:
• Formlines: the primary flowing lines that define the figure’s structure. They often swell and taper to guide the eye.
• Ovoids: rounded rectangular shapes used in joints, eyes, and structural transitions.
• U-forms: shapes that create rhythm, fill space, and connect components.
In carving, these forms must work in three dimensions. A drawn ovoid becomes a carved depression or raised feature with bevels, edges, and shadow. Skilled northwest coast carving translates the graphic system into sculptural form without losing clarity.
Positive and negative space
Many strong Indigenous wood carvings rely on clean separation between elements. Negative space is not leftover; it is planned. Background recesses, undercuts, and clean channels help the figure read clearly, especially on large pieces like wall panels or totem poles viewed from a distance.
Why “reading” matters
Carvers often talk about how a piece “reads.” That means the design is legible: the figure is identifiable, the relationships among parts make sense, and the lines flow. Good reading comes with proportion, consistent line weight, and careful transitions between forms.
Northwest Coast carving forms: how techniques shift by object
Depending on the object, the same toolkit can yield very different results. Here are a few common forms and how materials and tools influence the approach.
Masks and headdresses
Masks require careful hollowing, balanced thickness, and attention to how the piece sits on the face. Thin edges must be strong enough to handle movement, yet light enough for wear. Adzes and crooked knives may be used for hollowing, while chisels and knives refine features like eyelids, teeth, and brows. For examples of carved forms, see Masks and Headdresses.
Totem poles
Totem poles emphasize bold readability and strong silhouettes. Carvers often work at scale, using larger adzes and chisels to establish big shapes first. The depth of cuts must hold up outdoors, and surfaces are designed to throw shadow. You can explore this form here: Totem Poles.
Wall panels and plaques
Panels are often relief carvings, where formline design is especially prominent. The challenge is creating depth and crispness without weakening thin connecting areas. Clean background recessing and consistent edge work are key. See Wall Panels and Plaques.
Boxes and chests
Boxes combine joinery and carving. Traditional box-making knowledge includes understanding grain direction, corner integrity, and lid fit. Carving can be on the box face or lid, and finishing must account for wear. Explore Boxes and Chests.
Bowls and utilitarian forms
Bowls require controlled hollowing and smooth interior transitions. Tool marks may be left as evidence of process or refined for function. Grain direction is critical to prevent tear-out in the bowl interior. See Bowls.
Hand-carved rattles
Rattles often involve both sculptural form and acoustic function. Most are assembled from one piece of wood cut in half and hollowed, requiring careful fit and balance. Fine detail work is common, and the finish must tolerate being held and used. See Hand Carved Rattles.
Tool care and workshop practices that protect the work
Because wood responds to humidity and temperature, and because edge tools respond to impact and corrosion, beneficial workshop habits are part of authentic carving methods.
Storing wood and preventing cracks
• Acclimatize wood in the workspace before final carving when possible.
• Avoid rapid drying (direct heat sources and strong sun) that can worsen checking.
• Support larger pieces evenly to prevent warping while resting.
Maintaining edges and handles
• Hone frequently rather than waiting until tools are very dull.
• Keep tools clean and dry, especially in coastal environments where rust can develop quickly.
• Check handles for looseness or cracks; a secure handle is a safety requirement, not a preference.
Safe carving posture
Traditional carving tools are efficient, but they demand respect. Stable clamping or bracing, consistent body positioning, and clear cutting paths reduce the chance of injury. Many carvers adopt a practice of always knowing where the blade will go if it slips and never placing the non-dominant hand in that line.
Recognizing authentic carving methods and respectful context
People often ask how to recognize quality and authenticity in Indigenous wood carvings. Technique is one part of the answer: clean edges, confident lines, balanced proportions, and finishes appropriate to the form. But authenticity also involves cultural integrity and honest representation.
When learning about indigenous wood carving, it helps to look for:
• Clear artist attribution and community connection when available.
• Design coherence: formline elements relate properly, and the composition reads cleanly.
• Material honesty: the wood and finish suit the object rather than imitating another medium.
• Respectful presentation: descriptions that avoid stereotypes and acknowledge cultural specificity, ensuring that the cultural significance and context of the objects are accurately represented.
For a deeper discussion focused on collecting and identifying respectful sources, see What Sets Authentic Northwest Indigenous Carvings Apart.
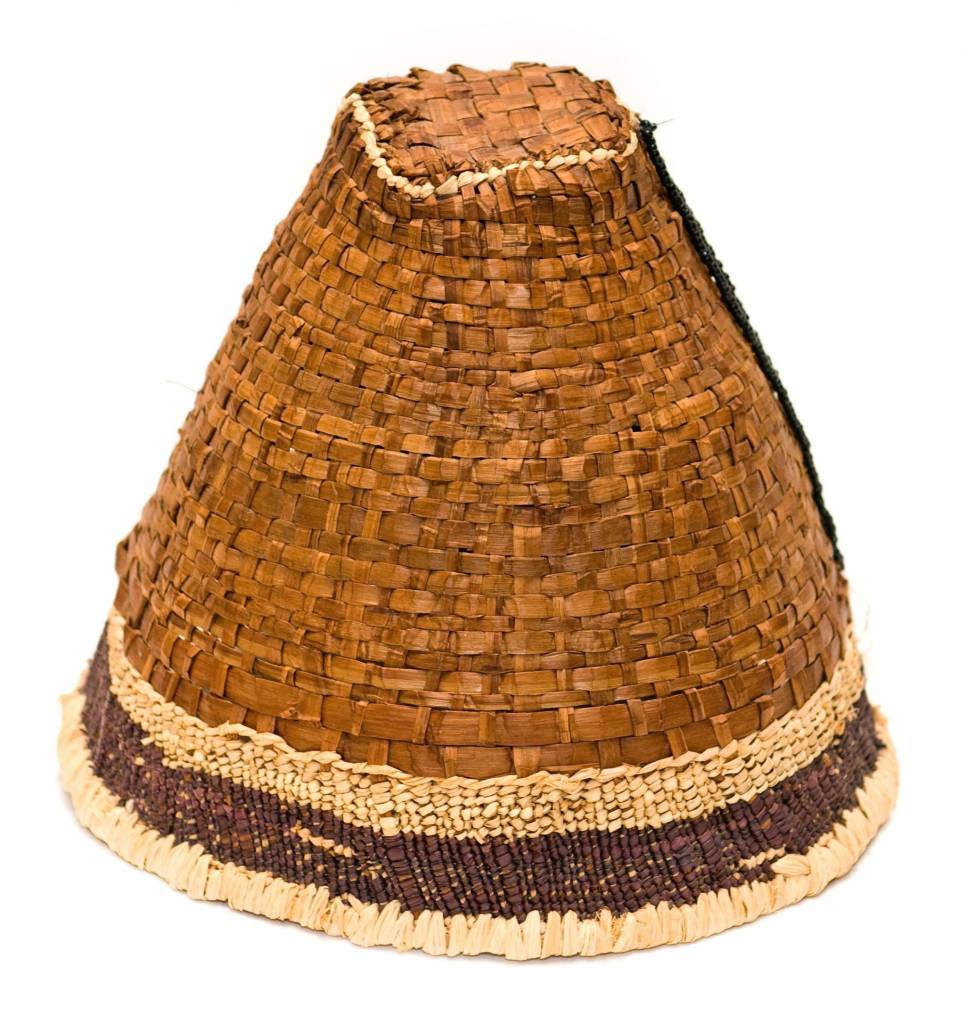
Cedar beyond carving: bark, weaving, and related knowledge
On the Northwest Coast, cedar knowledge extends far beyond carved objects. Understanding this broader relationship helps explain why cedar carving traditions from the Northwest Coast carry such weight. Cedar is also used in weaving, clothing, and regalia, and each practice has its protocols and skills. If you’re interested in Cedar's textile side, you can learn more through Cedar Bark Weaving.
Traditional tools in contemporary hands
Many carvers today blend traditional indigenous carving approaches with contemporary tools and shop practices. You might see power tools used for roughing out, followed by hand tool finishing to preserve the line quality associated with traditional carving tools. This kind of hybrid workflow can be practical without being inauthentic. What matters is whether the artist maintains control over the design, honours the visual language, and completes the piece with skilled handwork where it counts.
For those interested in the tools themselves, you can view examples of carving equipment in the Hand Tools collection.
Common misconceptions about Indigenous wood carving
“All Northwest Coast carving looks the same."
Northwest Coast carving includes many distinct nations and communities, each with its histories, preferences, and family styles. Even within formline design, there are differences in how lines flow, how faces are shaped, and how figures are composed.
“Formline is just decoration."
Formline is structural. It organizes the body of the figure and determines how the image reads. When carved well, the viewer can often follow the formlines to understand how the figure is built.
“Smooth equals better."
Some of the most compelling Indigenous wood carvings intentionally show tool marks. An adzed surface can communicate energy and tradition, showcasing the craftsmanship and cultural significance behind the carving process. A smooth surface can also be appropriate, especially for painted work. Quality is about intention and execution, not a single finish standard.
How to deepen your understanding as a viewer
If you’re learning to appreciate indigenous wood carving, focus on a few practical viewing habits:
• Look for line confidence: do curves flow cleanly, and are corners crisp where they should be?
• Study depth: Are recessed backgrounds consistent, and do raised forms feel intentional?
• Notice transitions: strong work often has elegant transitions between planes rather than abrupt, accidental steps.
• Ask what the object is for: a mask, a panel, and a bowl all have different needs that affect how the carving is done.
You can also compare different forms side-by-side by browsing a range of Indigenous wood carvings, such as the Northwest Indigenous Carvings collection, and observing how design choices shift across object types.
A note on related carving traditions and materials
While this article focuses on wood, many Northwest Coast artists also carve stone, metal, and other materials, each with their own traditional carving tools and processes. For example, Haida argillite carving is a distinct tradition with specialized techniques tied to a specific stone source. If you are keen to explore that medium, see Argillite Carvings: The Sacred Black Stone of Haida Gwaii and the Haida Argillite collection.
Conclusion: technique, material, and meaning working together
Traditional Indigenous wood carving is the meeting point of design knowledge, material understanding, and disciplined hand skill. From selecting carving materials like cedar to sharpening traditional carving tools, and from drawing formline designs to carving clean, readable forms, the process reflects generations of learning. When you view Indigenous wood carvings with attention to tool marks, edges, depth, and composition, you start to see not only the finished image but also the decisions and teachings inside it.
Whether you are a new learner or a longtime admirer of Northwest Coast carving, approaching the work with patience and respect is part of understanding it. The more you learn about tools and technique, the more clearly the carvings speak, revealing the cultural significance and stories embedded within each piece.


Comments
Be the first to comment...